cookieOptions = {...}; Kent Heartstrings: October 2014

Repurposed. Jars.

Friday, October 31, 2014


Happy Friday!


Jars. I have a bazillion of them. I have a complex or something, because I cannot get myself to throw away any glass jars.  I hoard them in my garage.  In order to lessen the piles upon piles I try and use them for any storage solutions that I can think of- food, art supplies, toiletries, gifts…anything. They are so easy to repurpose because all you need to do is give the lid a quick spray of paint and maybe even add some washi tape, and poof you have given it new life.  Here is another way I utilize jars in my home....


Happy Repurposing!


Blessed is She // Daily Grace for Pondering Hearts

Thursday, October 30, 2014


I want to share with you this amazing ministry I am very blessed to be a part of!  My lovely friend Jenna, followed the whispers of the Holy Spirit and launched this incredible work and I am just so proud of her.  So what the heck is it? Blessed is She is, 


"A community of women, in the trenches together, trying to grow in our faith and apply God’s word to our daily lives. Join us as we love each other, support each other, and dive into the Word together. We share daily devotions based on each day’s scripture readings." 


"Blessed is she who believed that there would be fulfillment of what had been spoken to her by the Lord" Luke 1:45 


I feel very very privileged to be a part of the team that makes this ministry run, and in case your interested, I wrote the devotional for today, so check it out. If you want to subscribe and get a daily newsletter sent to your inbox of the readings of the day and a personal devotional written by a woman for women, then head over here, scroll all the way down and put in your information.  
This ministry means so much to me. I love Jesus, I love His Word and I have such a heart for woman of all walks of life. In these modern times it gets hard to sit down and read, let alone have quite time with the Lord.  Life is fast paced and we have to work hard to keep up. I am so glad that there is no longer a fight for me to find my bible, figure out the readings and have a few moments to listen, because now its just sent right to my email! Hallelujah!  When I see the Blessed is She devotion for the day in my inbox, I know its time to give God at least those 5 minutes in my day! I hope you are blessed by this ministry, please keep it in your prayers. 


Also, Jenna, again such a talented woman! Designed an incredible Advent journal


It is a great tool to dig into season more, really stay focused on what is important and prepare our hearts for the coming of Christ! All proceeds go to the costs of running and expanding this ministry.


Happy Thursday!

A New Spin on a Old Tradition // Prop Staging Photo Birth Announcement

Monday, October 27, 2014


Hello, and Happy Monday to you all! We went off the grid this weekend on our annual family river trip, where we camp, water-ski, play games, eat lots of junk and laugh a lot. There literally is no cell phone reception, so it was especially nice to not have the temptation of "plugging-in"....but its Monday, we are back to the swing of things and now doing tons of laundry and getting plugged back in ;)

I love sending out snail mail! But I never carve out the time to do it routinely, so whenever there is an excuse to send out a cute card I am all over it. Christmas is crazy I send out close to 200+ Christmas cards! So before Charlie man was even born, I was already thinking of what birth announcement I would send out! I was brainstorming on Pinterest and came across an idea that I liked, it involved taking a picture of the baby but including all the birth information using props. LOVED IT! 

So let me break down what items you will need to pull this off...

1. A Camera, or even your phone. Whatever you use to take the actual picture make sure you have lots of natural light!....thank you Morgan for taking this picture for me, you are amazing!!

2. Cute outfit for baby, or consider wrapped in a blanket? naked? think about what you want, or maybe do all of them, but think of what your preference would be and do that first in case the babe is not cooperating

3. Backdrop- choosing a white backdrop is really key here since you are going to have so much interest elsewhere.  My friend Morgan, who took this photo, brought this comfy, hairy, white blanket from her home (upon my request!) but you could find your own equivalent here.


4. Ruler- you can keep your eyes out for them at thrifts, garage sales and such or my trusty friend amazon has one here


5. Clock- set the clock to the time the baby was born. I found this one at a garage sale, its broken, so the clock still is set to this same time....its a happy reminder every time I see it =)


6. Calendar Month- I just found a printable calendar I liked with the month I needed.  It was important to me that the Month, Year and numbers of the month were big and visible.  Circle the date your child was born


7. Blocks- make sure to get enough of the actual letters you want on the blocks. I got lucky and scored a set at the dollar section at Target. You can find a set on amazon too.

8. Something with a flat surface, I used a piece of bark (from our christmas tree) in this picture. This is for adding information later, I added the weight numbers.

9. Add any other props that you like or have sentimental value. I just liked the elephant so in the mix it went.

10. Use a photo editing program to add the weight and height details afterwards (I used picmonkey)


And because I love him....here are some more keepers =)  Gah! I cannot believe he will be ONE soon!


Not preggy yet? Pin this idea for later!


Follow Cassie Kent {Kent Heartstrings}'s board Kiddos on Pinterest.

Sharing With: Oak & Oats


Repurposed. Lazy Susan.

Friday, October 24, 2014


For a fun storage solution and general “catch all” container I repurposed what I think is an old chip and dip bowl.  I found this at the thrift and loved that shape and the fact that it is a Lazy Susan and spins around!


All I did was gave it some fresh paint and thus gave it a whole new purpose. I used Martha Stewart metallic gold and it’s my new obsession. What I love about it, is that it goes on really light, so I had to do many coats to get the coverage I wanted, but the coverage has a gold leafing effect so it looks old and handcrafted and has a great texture about it. I like that you can very lightly see brush strokes. The end result of this easy update was even better then I anticipated!  Go forth and repurpose. ;)

Have you done anything lately that has given an old object new life? Happy Friday!

Washi Tape Art // Kid Friendly Craft

Wednesday, October 22, 2014


This is me and Gigi's most recent kid friendly craft. Washi Tape Art. Wow, someone hold me back, washi tape is my new obsession. Its like nail polish or lipstick, I need every shade, color combination and pattern.  Gigi loved doing this craft and now is as addicted as I am, we want to put washi tape on.everything. Sorry Mike, our house will be covered. So for this craft you will need:
A blank canvas
Washi Tape
Mode Podge
A Sponge brush
And the directions are pretty straight forward: 
Hand washi tape to child
Sit them in front of canvas
Modge Podge over design
Enjoy and Hang masterpiece
Enjoy crafting and the fun quality time with your little one!


Linking up With: Pretty Pintastic Party


Hunter Boots Giveaway

Tuesday, October 21, 2014

I am just getting back from visiting family in Ohio for 5 days and well, FALL is magical. An absolute fairy tale and something Southern California lacks to a great degree. When packing I did not have room enough for all my boots, so I chose my riding boots to take with me and I happily wore them all day, everyday while in OH. But, I wish I brought my Hunter boots, because it rained several times while I was there, and gosh darn they would have made a cute fashion statement on those slightly dreary days. So to perk myself up a bit and You (I hope!)...I've teamed up with 13 other bloggers to bring you the chance to win your very own pair! You get to choose the color of course! (and never forget to pack them, ever!)
welliesgiveaway

The giveaway will run from 12:00 am EST on October 22nd until 11:59 pm EST on October 28th. This giveaway is open to U.S. residents only. Prize has a value of up to $150. Entries will be verified, so please be honest. Winner will be contacted via email and will have 48 hours to respond and claim prize before a new winner will be chosen. Use the Rafflecopter below to enter. Best of luck to you! :)
a Rafflecopter giveaway

Motivational Monday Link-up Party

Monday, October 20, 2014


Hosted by: Burlap and BabiesThe DIY MommyDwelling in Happiness, and Kent Heartstrings
Please Follow Your Hosts to Participate in the Party!

Burlap and Babies

The DIY Mommy

Dwelling in Happiness

Kent Heartstrings 

This is what I have been up to this week...sharing all the party details for my Grandma's 80th birthday! The theme was "Having a ball since 1934"...hope you have a ball!


Ready to share what motivates you? Link up a recent post of yours something that motivates you to create or just be awesome! Our goal is for this link up to focus on craft, DIY, & home posts so please try to remember that when linking up. Please limit it to three links per week and remember to link directly to your post. Do not link stores, giveaways, or other link parties. Also, hop around some of the other posts that have been linked up to share the love and get motivated by what others have been up to...because of course, this is Motivational Monday after all.

Each week, each hostess will feature their favorite post from the previous week. By linking up, you agree to let each host share your photo and link back to your site. Link party goes live Monday and ends at 5:00pm PST on Friday.


This week I am excited to bring you this fun little craft for the upcoming October holiday...Glittery Halloween Pumpkin Jars, by Kim from Life is Lullaby


Make sure to grab this button and boast away!
Kent Heartstrings

3 Reasons Why A Fantastic Photographer Was Our #1 Wedding Budget Priority


I was married in 2008.  Before Pinterest...(yes, it once did not exist). Before DIY weddings were a thing. Before taking pictures outside the church was really popular.  So when I chose a photographer that had an artistic approach it was still a new thing. 

When looking at our wedding budget, and it was a tight budget, as most are, we had to prioritize what was important to us as a couple in order to place the most money on those things. 
What was at the top of the list? The one item, that had a aster-ix **whatever it takes, we will pay**

A Photographer. 

Numero Uno. Moy Importante. (busting into spanish for extra emphasis)

Just to note, it wasn't just any photographer because we wanted something very specific. A photographer that had an artistic approach to their work (remember this was still fresh back on 07/08). A photographer that had a laid back disposition, because as a bride I did not want a high maintenance egotistical schmuck adding to the stress of the day. A photographer that understood the religious significance of this day (because that is the most important thing to us- our faith), and could really capture that in the church ceremony pictures.
So why did we value a good fantastic photographer pretty much above everything else??
I am guest posting over at The Wetherills Say I Do, so hop on over there for my 3 reasons....

Meal Swap

Saturday, October 18, 2014


It is no secret- I hate cooking. I am not very good at it, I am not passionate about it, its a chore, something that has to be done.  Mike is the Chef. He makes the yummy stuff.  I make food that is tolerable for surviving.  He makes food that is for thriving. I am always looking for ways to make meals more simple, EASY, appetizing, and basically spending the least amount of time in my kitchen as possible...

I am guest posting over at Life Could Be a Dream, hop on over there for all the deets on how to do a meal swap and free up at least one night a week of slaving away in the kitchen!


Heartstrings :: Share.Grow.Love - Making it in the Mountains

Friday, October 17, 2014


Heartstrings is place which introduces you to a post from a fellow blogging buddy that will hopefully inspire you and tug on your heartstrings.  I love connecting people through my blog and when I find a post that makes me want to jump out of my seat I couldn't be happier to share it with my readers. My hope is that this series will allow us to share new perspectives, stories, projects and inspiration that will make you want to connect with other bloggers. Just one simple way to connect minds, souls and hearts.

If you have a specific post that you feel would be great for this series, please contact kentheartstrings(at)gmail(dot)com! The post can range from a unique DIY project to thoughts on marriage and family...all aspects of our lives are important and we want to hear about all of them! I look forward to hearing from you!

Today I am pumped to bring you Kristi who is the voice behind making it in the mountains where she writes about all things DIY.  I love all her great tutorials on how to make fabulous pieces of furniture and statement pieces of decor for your home. I hope you enjoy her and this fantastic tutorial on how to make these ladder shelves, you will see what I mean!


Follow along as she journeys through making her boring new house a rustic mountain retreat.

Facebook // Twitter // Instagram // Pinterest

Today, I am SOOOO excited to share with you our very last DIY project for the Outdoor Makeover Challenge! If you missed anything, you can catch up on all of the details here. In keeping with this Outdoor Makeover Challenge , we've been tackling all sorts of fun DIY's through the month of June, my favorite of which would have to be this DIY Pottery Barn Knockoff Table. This weekend, we finished up the last piece of the puzzle ... this DIY Ladder Shelf.     DIY Ladder Shelf @ making it in the mountains     It all started with this soon-to-be empty corner of our courtyard deck (we intend to move the BBQ to the backyard, so that we'll have access to it directly from our kitchen doors).   Deck Makeover - Before @ making it in the mountains   This corner gets a ton of sun, so I knew right from the start, that it would make the PERFECT spot for a plant stand. And so, off to Pinterest I went in search of some inspiration. At first I was picturing a potting bench style table, but then 
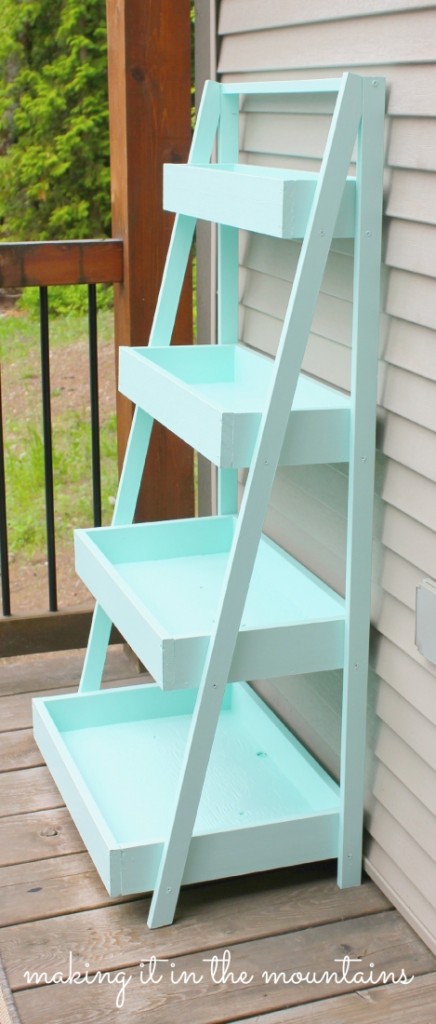
this bright shelf by none other than my favorite handy-gal, Ana White, totally caught my eye. Knowing we eventually want to build a small bar table in another corner, it seemed like a much better idea to go with something completely different for this space. I also really liked the idea of having a bit of a ledge around each shelf to help keep everything contained and safe from any wind. My mind was made up the moment I saw it ... I needed this shelf!
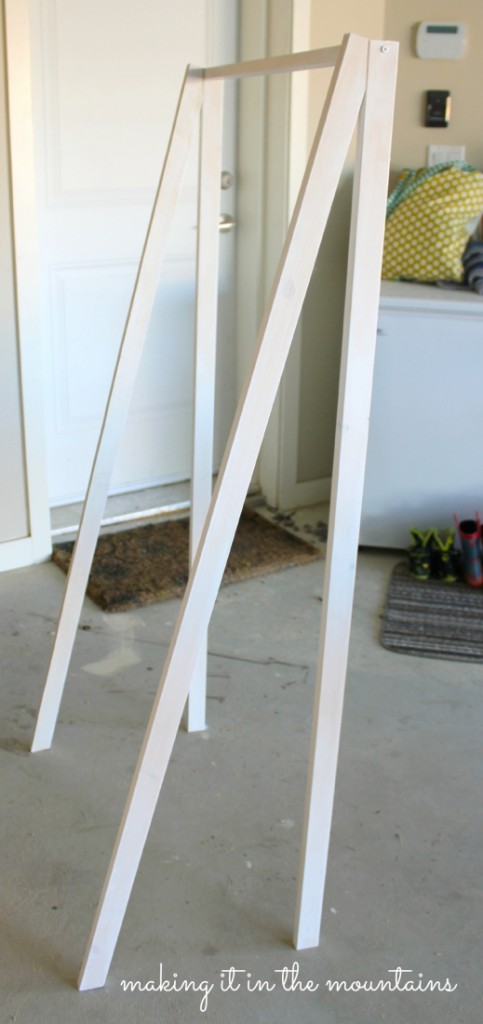
 Following 
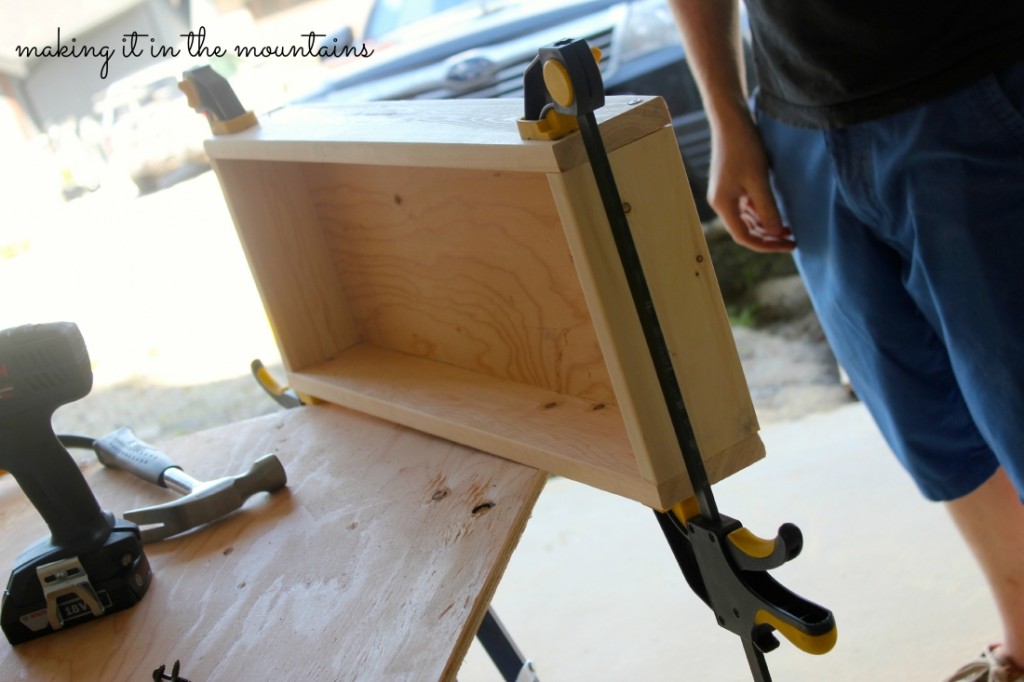
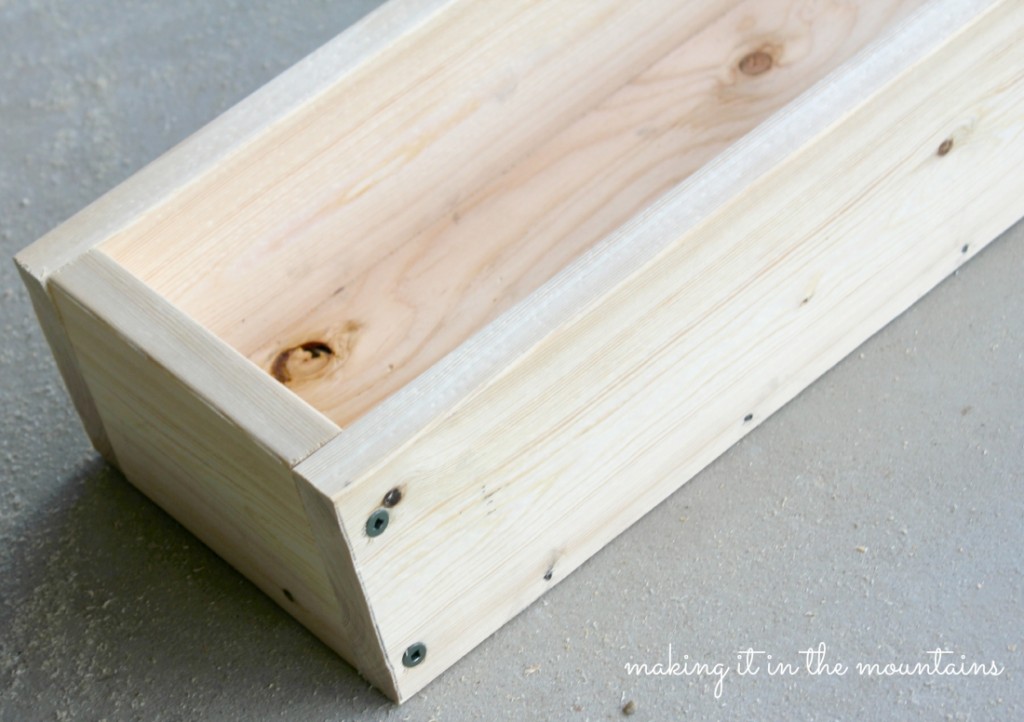
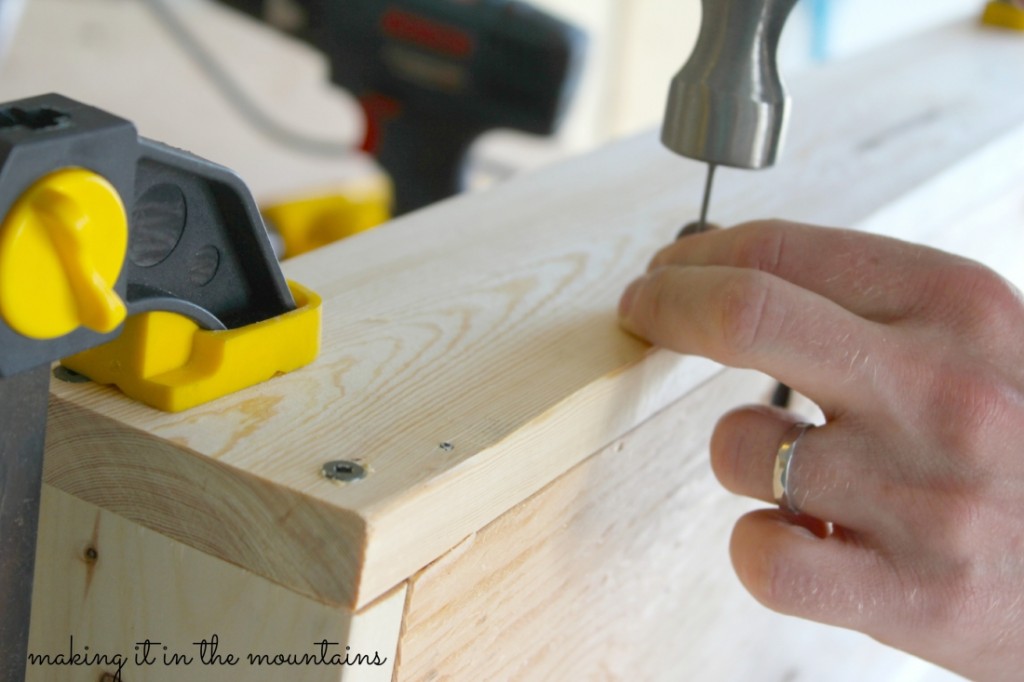
these plans, Brady got to work building the shelves and the frame in just a couple of hours. We did make a few changes along the way, the first of which started with the lumber - because our little hardware store didn't have any 1x3 available, we decided to use 1x4 in it's place around each shelf.   DIY Ladder Shelf @ making it in the mountains   DIY Ladder Shelf @ making it in the mountains   Brady followed the instructions screwing the ends together, but decided to use finishing nails along the bottoms of the shelves to avoid having a zillion screws show across the front.   DIY Ladder Shelf @ making it in the mountains   DIY Ladder Shelf @ making it in the mountains     
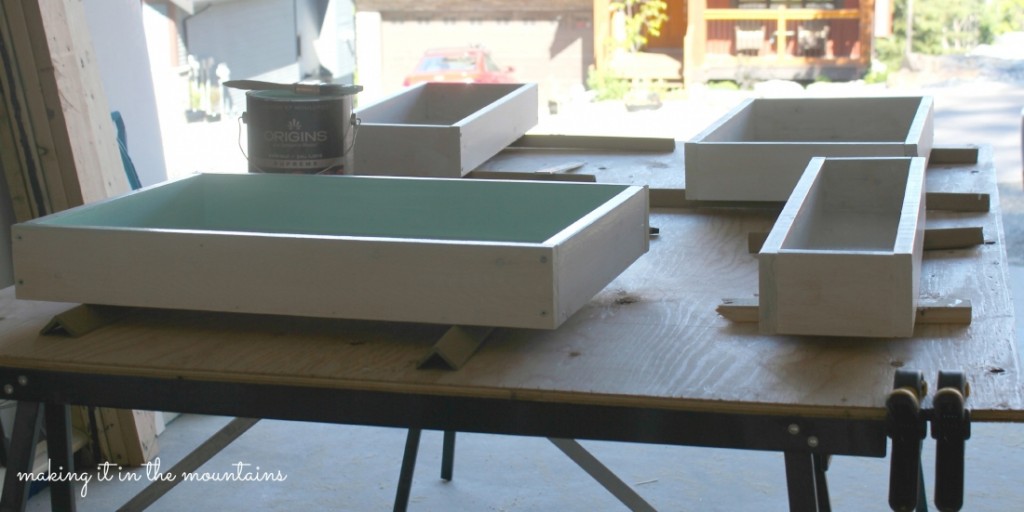
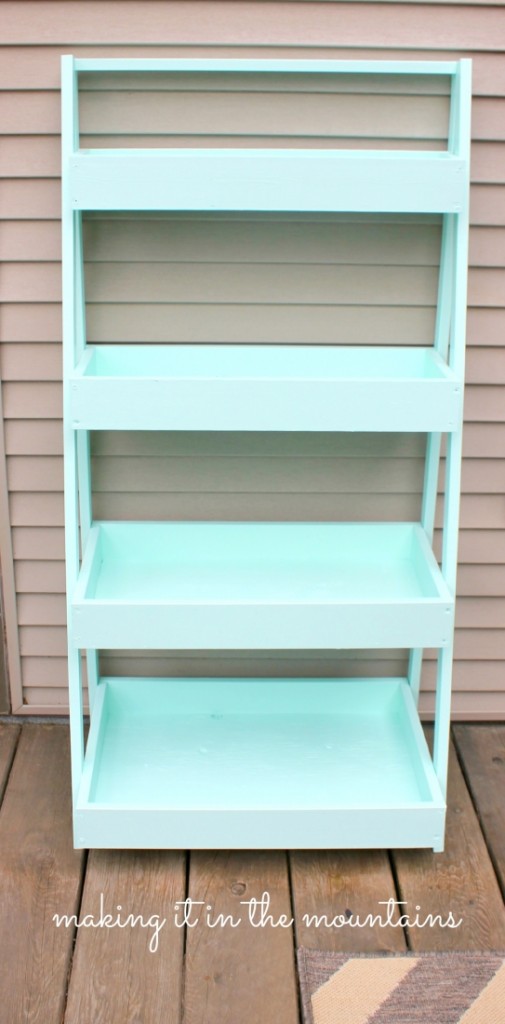
And then it was my turn to get to work with some painting. Thinking it might be easier to get into all the nooks and crannies, I wanted to tackle this part before it was all put together. First up was a good coat of primer because, let's face it, I don't want to have to repaint this thing every year! I slapped on a generous coat of Zinsser Bulls Eye 1-2-3 heavy duty primer and let it dry overnight. The next morning, I did a really quick all-over sand as recommended on the back of the primer can and then I was finally ready to paint! With some help from my friends on Facebook and Instagram, I decided on an absolutely GORGEOUS paint colour (Benjamin Moore Origins's Sweet Turquoise OR-368) and I just couldn't wait to see it on my shelf!!! Because this baby is going to live outside, I was sure to pick up an exterior paint to help protect it from the elements. Here's how everything looked after some primer and the first coat of paint:   DIY Ladder Shelf @ making it in the mountains   DIY Ladder Shelf @ making it in the mountains   DIY Ladder Shelf @ making it in the mountains     
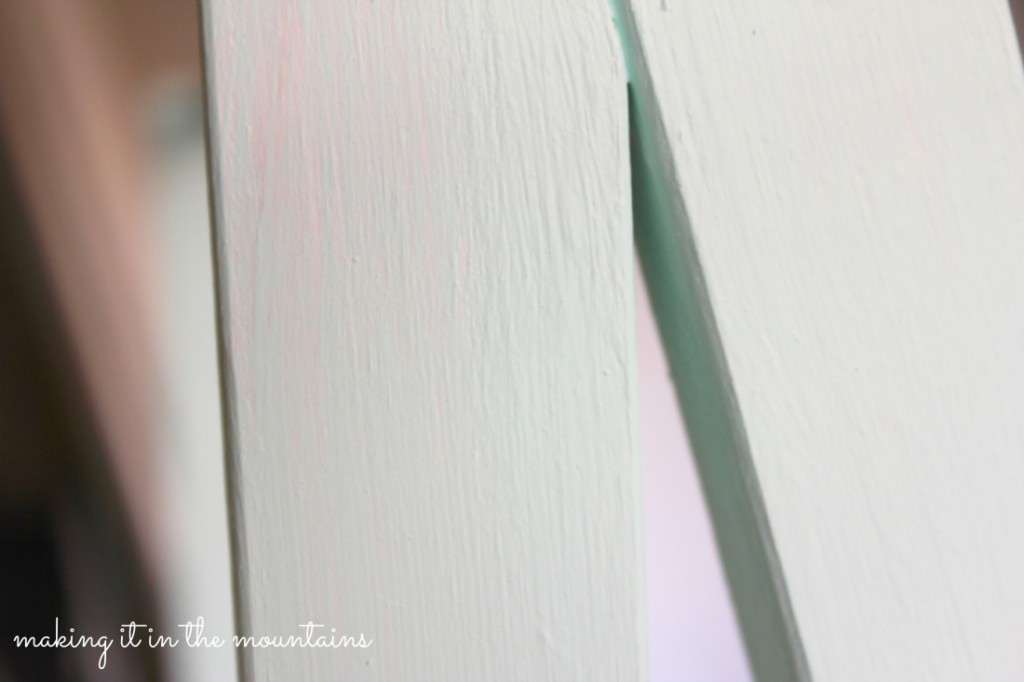
And the second coat:   DIY Ladder Shelf @ making it in the mountains 
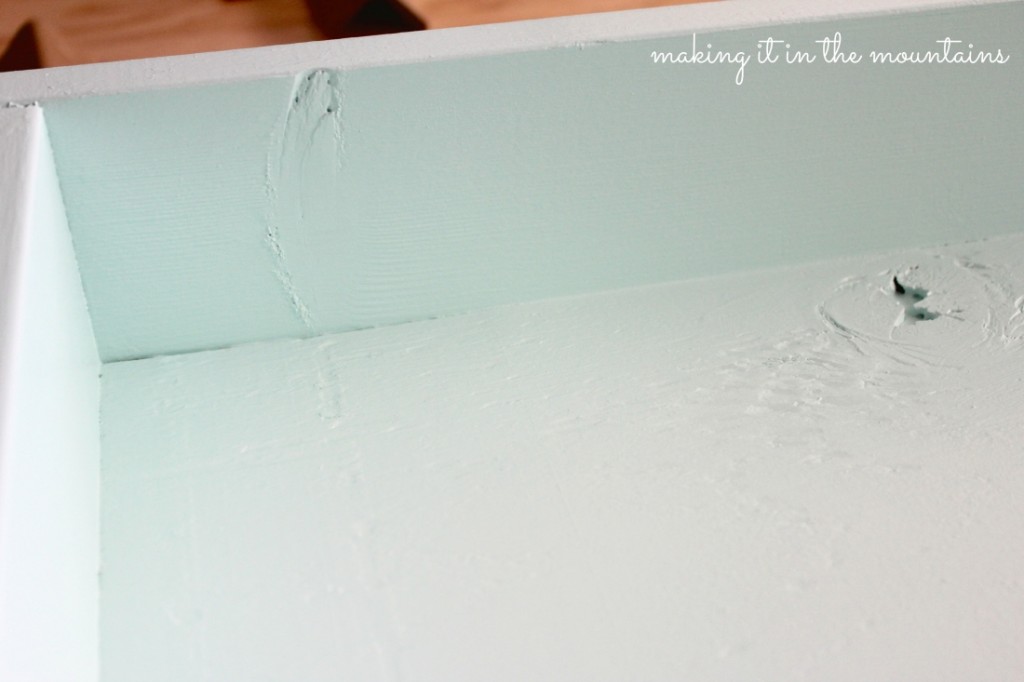
It was definitely LOVE at first sight! In fact, I smiled a HUGE, this is the prettiest colour ever, smile with the first brush of paint!!! Even more ... I loved it SO much that on my walk back in from the garage to our main level, I found myself looking for more things that I could paint! Perhaps this will be the summer of Sweet Turquoise (I couldn't possibly regret that, right?)!     
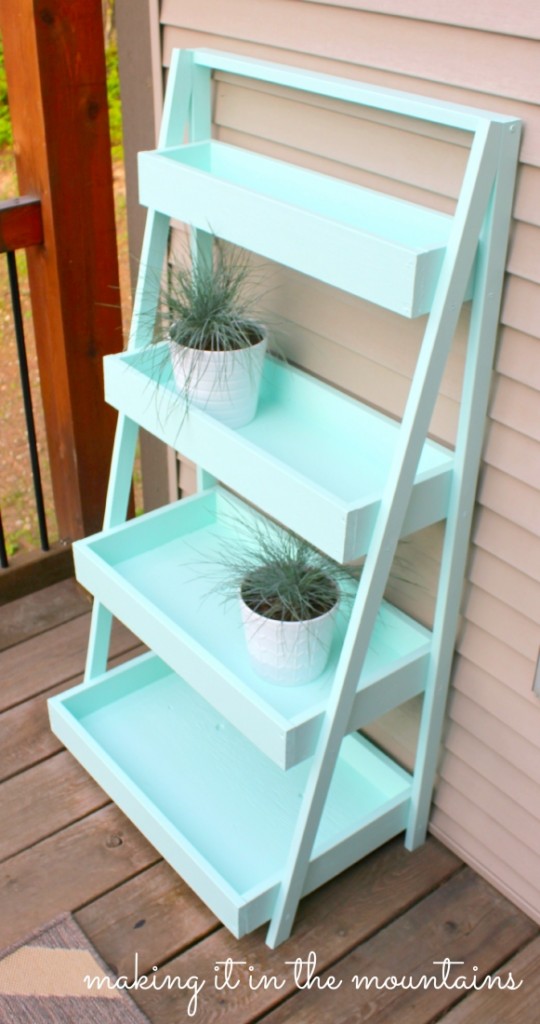
Finally, it was time to put it all together! Brady went his own way with this part too - the original instructions called for the shelves to be offset a bit, but he really wanted the shelves to all line up along the back. So, to do this, he simply placed the shelf frame with the back down on his workbench and, after marking the suggested distance between each one, he set the shelves in so that their backs rested on his workbench too, creating a flush back. Lastly, he attached them all to the frame with a couple of screws on each side. Here's how it all came together:   DIY Ladder Shelf @ making it in the mountains   DIY Ladder Shelf @ making it in the mountains   DIY Ladder Shelf @ making it in the mountains   DIY Ladder Shelf @ making it in the mountains  
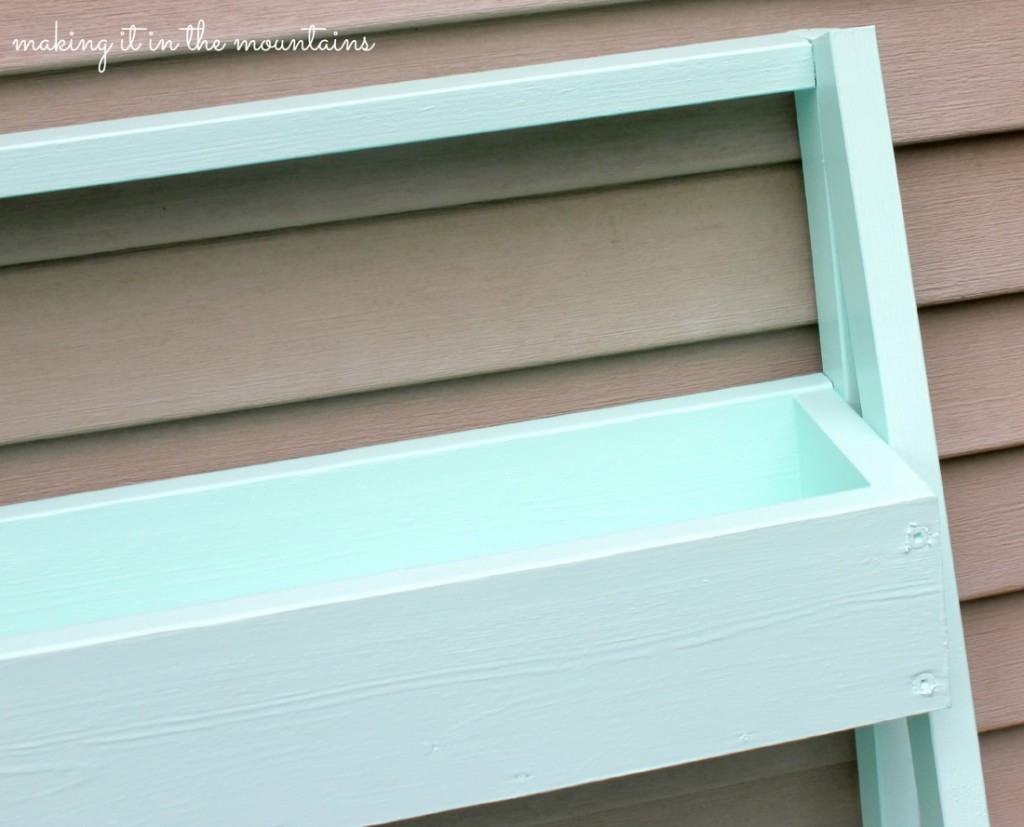
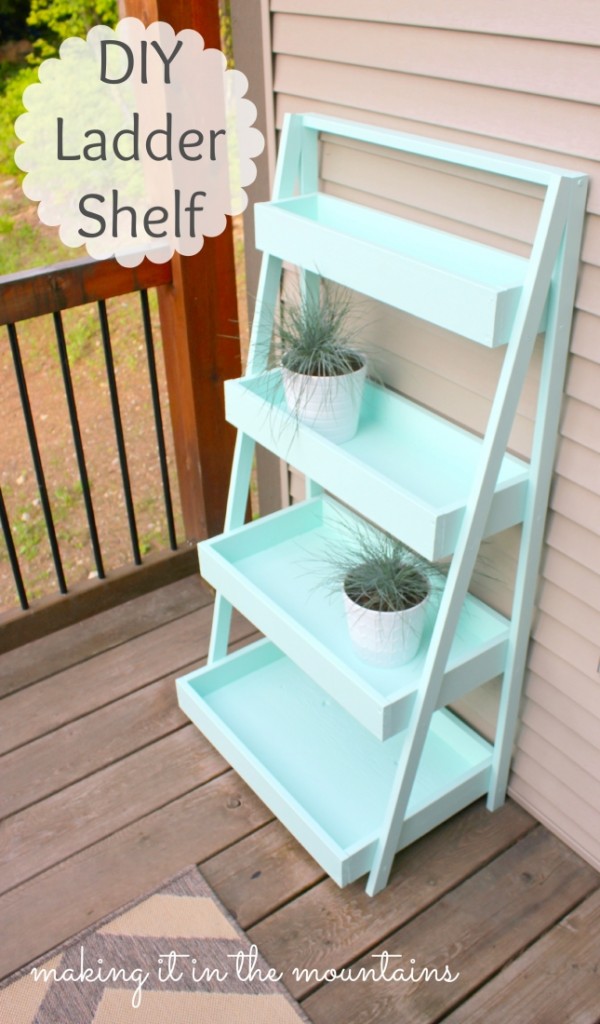
 What do you think? I hope you are just as in love with it as I am (and I'm not just talking about the colour)! Clearly this shelf isn't just made to hold plants outside ... where could you see putting one of these to work in your home? Would you paint it a bright colour, a classic white or black, or maybe stain it? I CANNOT wait for you to see how the whole space comes together in our Outdoor Makeover Challenge!!! Follow along with me on Facebook and Instagram to catch all of my sneak peeks and be sure to check back first thing Thursday morning for the full reveal! *UPDATE: See how I put this lovely ladder shelf to work in our finished space here!*

Thanks for being here today Kristi!
Related Posts Plugin for WordPress, Blogger...