cookieOptions = {...}; Kent Heartstrings: November 2014

Coffee Giveaway

Friday, November 28, 2014

Now, it's time for a little surprise! Raise your hand if you like coffee! Yep, I knew it. Well, I'm teaming up with five of my sweet blog friends to bring you a coffee date care package giveaway! One winner will receive a bag of Sweet Aroma Coffee, an Oh Simple Joys coffee mug, and a vintage hand-stamped "Rise & Shine" spoon. I can't wait to see who wins!

Giveaway will end at midnight EST on December 3rd. Open to U.S. residents only. Winner will be contacted via email and will have 48 hours to claim their prize before another winner will be chosen. 
All entries will be verified, so make sure you play by the rules!

Leather Statement Necklace // Feather


Excited to bring to you the last leather necklace tutorial of this series. The leather Feather necklace! If you happened to miss the first three there is a round up of all of them at the end of the post. Enjoy!


Supplies:


Step 1: Cut 3 leather rectangles in varying colors


Step 2: Use this template to trace the leaf/feather shape you need


Step 3: Cut out shapes


Step 4: With your scissors make tiny triangle incisions all the way around the feather


Step 5: Repeat. Repeat. Repeat.


Step 6: Use a push pin to make a hole for your jump ring


Step 7: Insert jump ring


Step 8: String on chain and add decorative beads (optional)


Step 9: Use jump ring to close up ends of the chain


All Done!

How to Style the Feather necklace:


Shirt- Nordstrom // Skirt- thrift

All tutorials:

Heartstrings :: Share.Grow.Love. - Pepper Design Blog

Wednesday, November 26, 2014

Heartstrings is place which introduces you to a post from a fellow blogging buddy that will hopefully inspire you and tug on your heartstrings.  I love connecting people through my blog and when I find a post that makes me want to jump out of my seat I couldn't be happier to share it with my readers. My hope is that this series will allow us to share new perspectives, stories, projects and inspiration that will make you want to connect with other bloggers. Just one simple way to connect minds, souls and hearts.

If you have a specific post that you feel would be great for this series, please contact kentheartstrings(at)gmail(dot)com! The post can range from a unique DIY project to thoughts on marriage and family...all aspects of our lives are important and we want to hear about all of them! I look forward to hearing from you!

Super excited to be sharing a post from my dear friend, Morgan's blog- Pepper Design Blog! She is nothing short of DIY and craft genius and I love her so much. I hope you enjoy her and this incredible post! A little last minute Thanksgiving inspiration for you!

Kid’s Craft: Fall Leaves Milk Art & Thanksgiving Place Cards

Kid's Thanksgiving Project Idea: Fall Leaves Milk Art & Place Cards | PepperDesignBlog.com
Part of my Thursday routine with Liv and Taylor this school year has been to co-host a ‘co-op preschool’ with four of my girlfriends and their kids. We swap who will lead each Thursday and this talented lady set up a curriculum based around arts and sciences.
Advertisement
Kid's Thanksgiving Project Idea: Fall Leaves Milk Art & Place Cards | PepperDesignBlog.com
This last Thursday was my turn to lead an art lesson and I’ve been meaning to try out milk art for a while. It’s really rather a simple process but because of the unconventional art style, such a big hit with kids. I tied our lesson all together with a nature walk, a discussion on why leaves change color, and a scavenger hunt to find ‘inspiration’ for our craft project. Then we came back to the house to create.
Kid's Thanksgiving Project Idea: Fall Leaves Milk Art & Place Cards | PepperDesignBlog.com
Considering that milk is such a staple in our home (the girls love milk to a crazy degree, especially T), I thought that this project would be an ideal one for our collaboration with Got Milk and on sharing creative ways to incorporate milk (beyond a big cold glass of it) into the everyday. Milk keeps these girls strong and it’s one of the few consistents in our daily lives that I know I can rely on for a balanced diet (Liv is a great eater, T is a little more difficult, but without resolve she’ll walk up to the fridge and ask for ‘malk’ several times a day).
Kid's Thanksgiving Project Idea: Fall Leaves Milk Art & Place Cards | PepperDesignBlog.com
Using milk as the base and food coloring as the dye, milk becomes kid-friendly marbling on a grand scale (like, cookie sheet grand scale). This is such a great project whether you have 30 minutes or a couple of hours – Liv has already asked to recreate it multiple times.
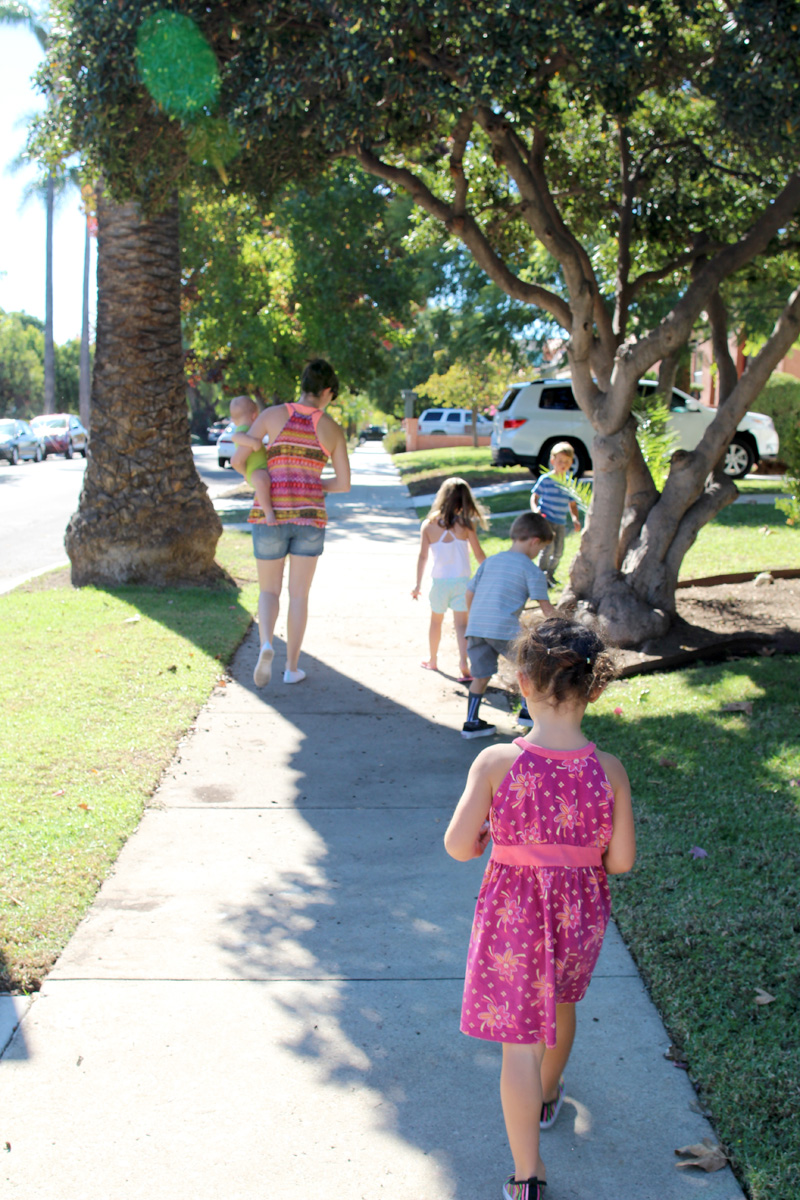
Back to that Thursday morning lesson… we started our day off with a little nature walk around the neighborhood. As a group, we observed the tall trees and the fallen autumn leaves along the sidewalk (though they were a little scarce – did I mention it was in the 80s? crazy.)
Kid's Thanksgiving Project Idea: Fall Leaves Milk Art & Place Cards | PepperDesignBlog.com
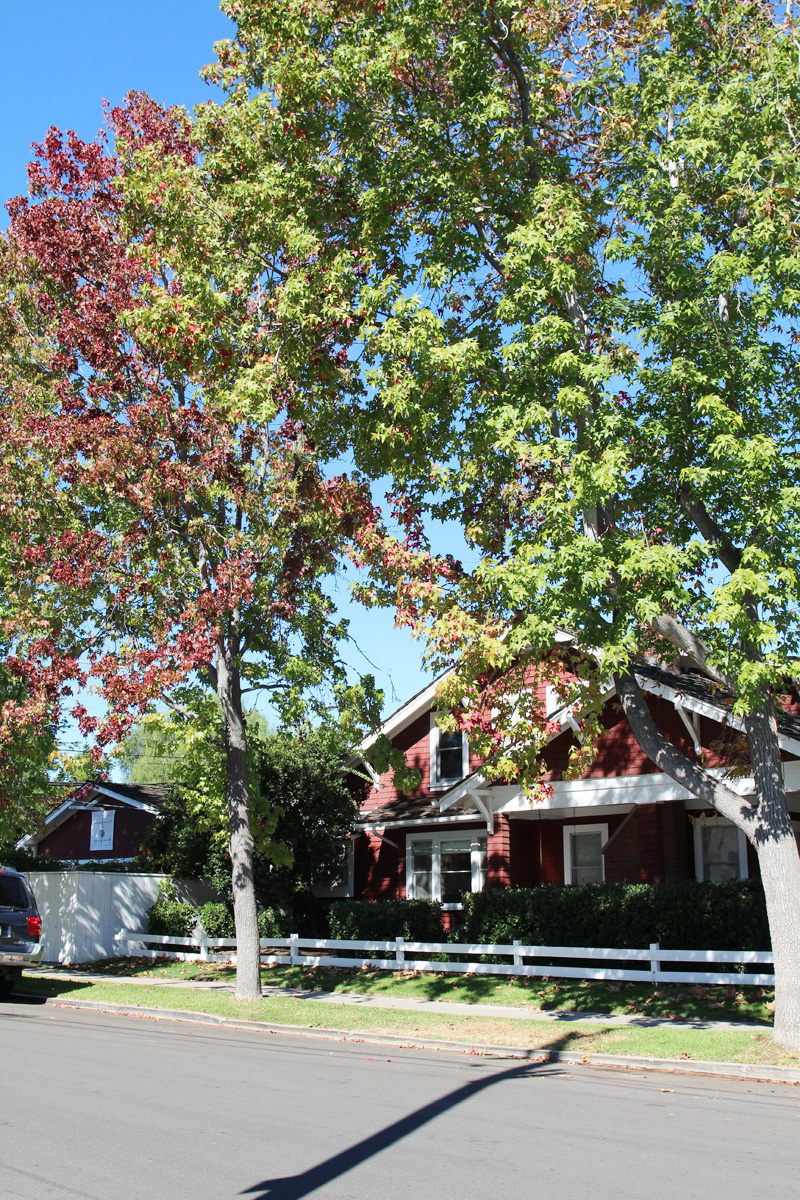
We do have a row of maples that change color with the season and that’s where we found most of our treasures. How I adore those three trees! We talked about why trees are important for our environment, why they change colors as the days get shorter and what role ‘chlorophyll’ and ‘photosynthesis’ play.
Kid's Thanksgiving Project Idea: Fall Leaves Milk Art & Place Cards | PepperDesignBlog.com
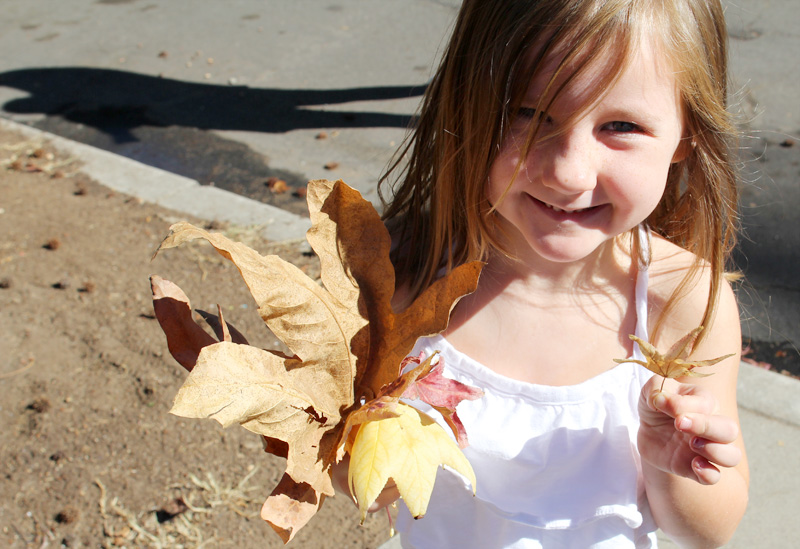
The scavenger hunt side of our nature walk meant finding beautiful fall leaf inspiration. There were a few red and yellow leaves, but mostly brown!
Kid's Thanksgiving Project Idea: Fall Leaves Milk Art & Place Cards | PepperDesignBlog.com
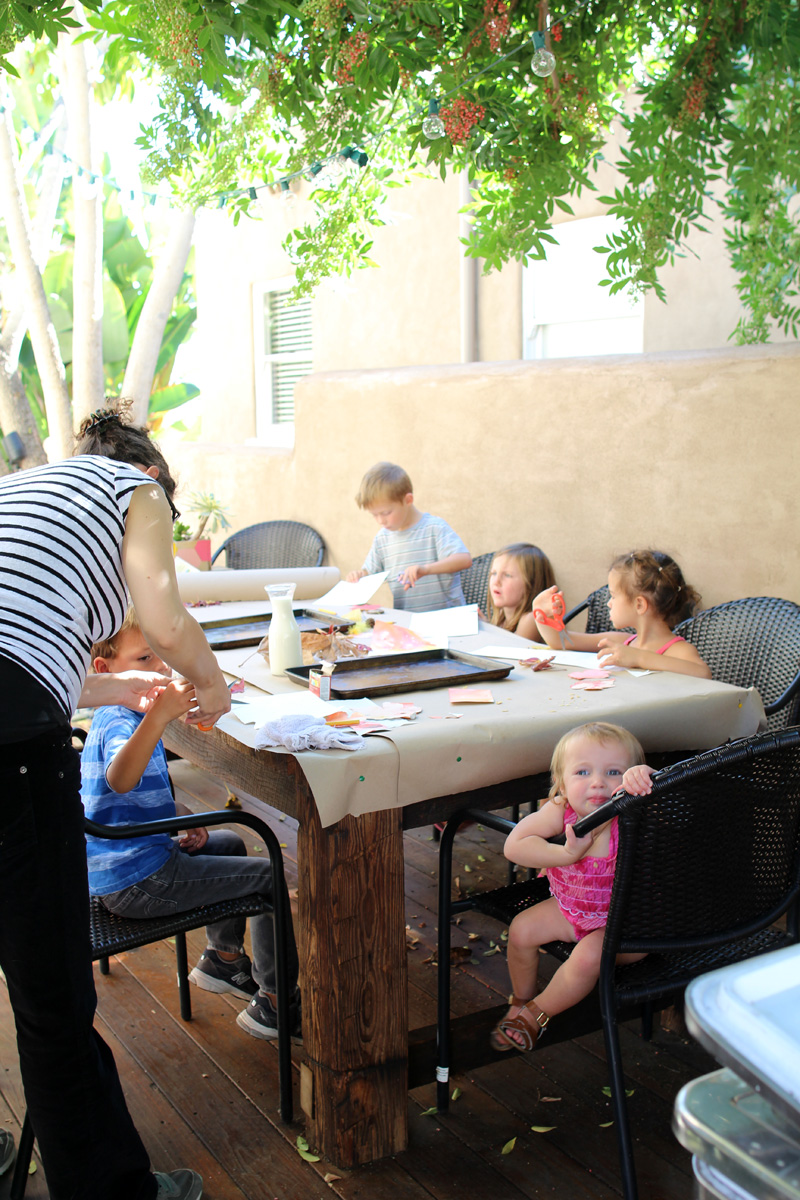
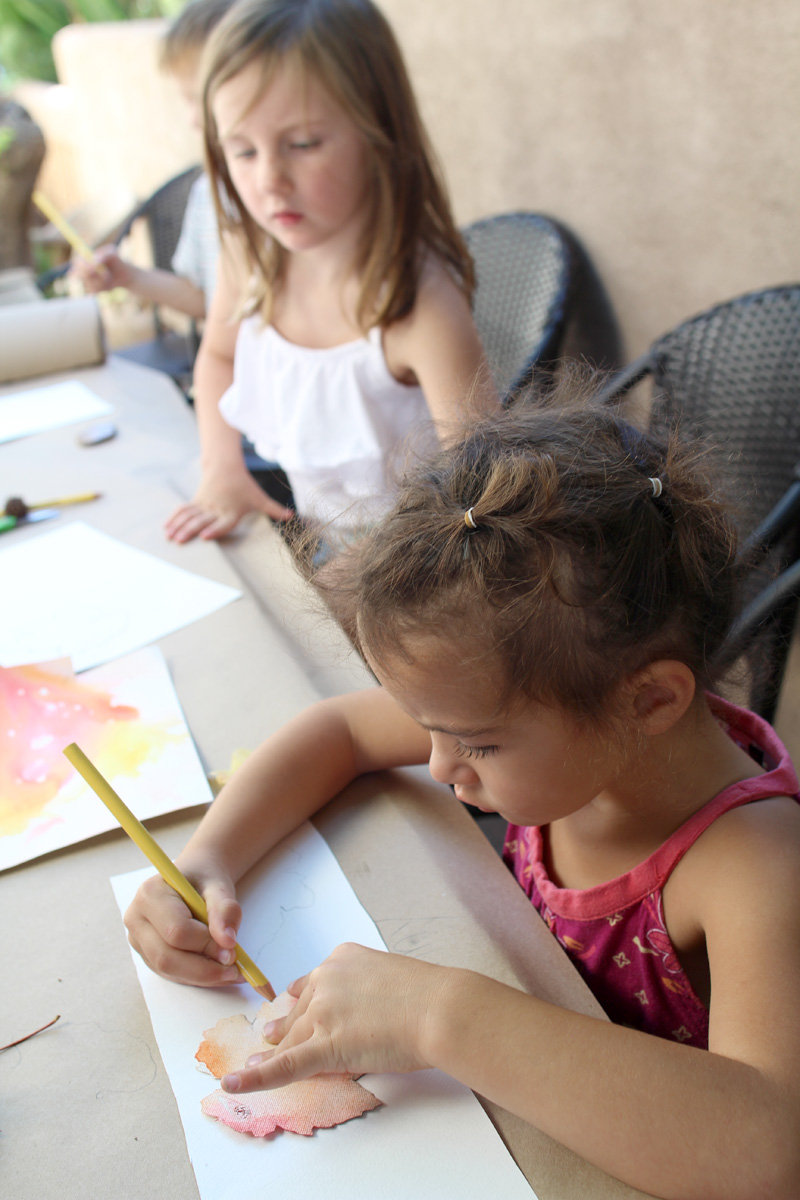
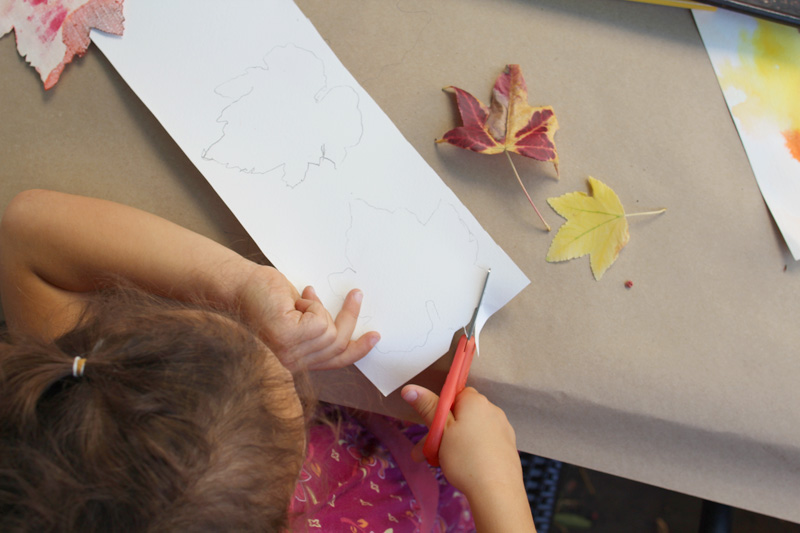
Leaves in hand, we laid them out on our craft paper-covered table (they sell awesome rolls of brown paper at home improvement stores for so cheap) so that everyone could observe their shape and colors as we continued.
Kid's Thanksgiving Project Idea: Fall Leaves Milk Art & Place Cards | PepperDesignBlog.com
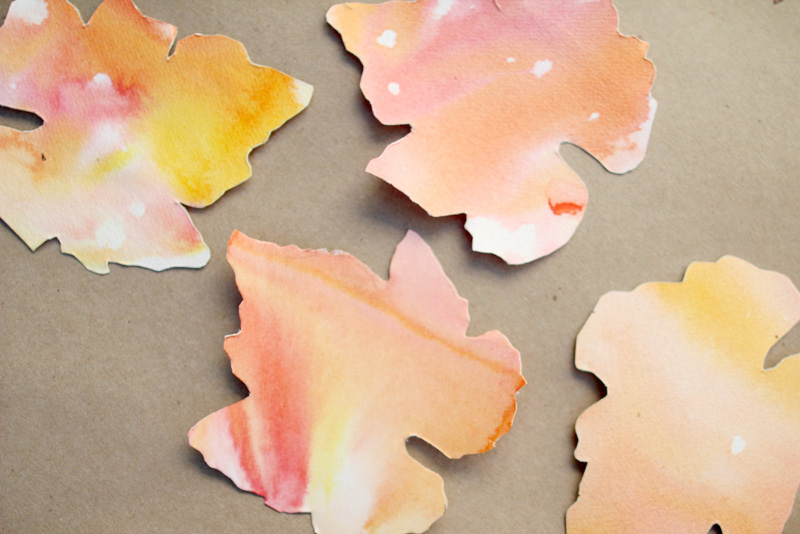
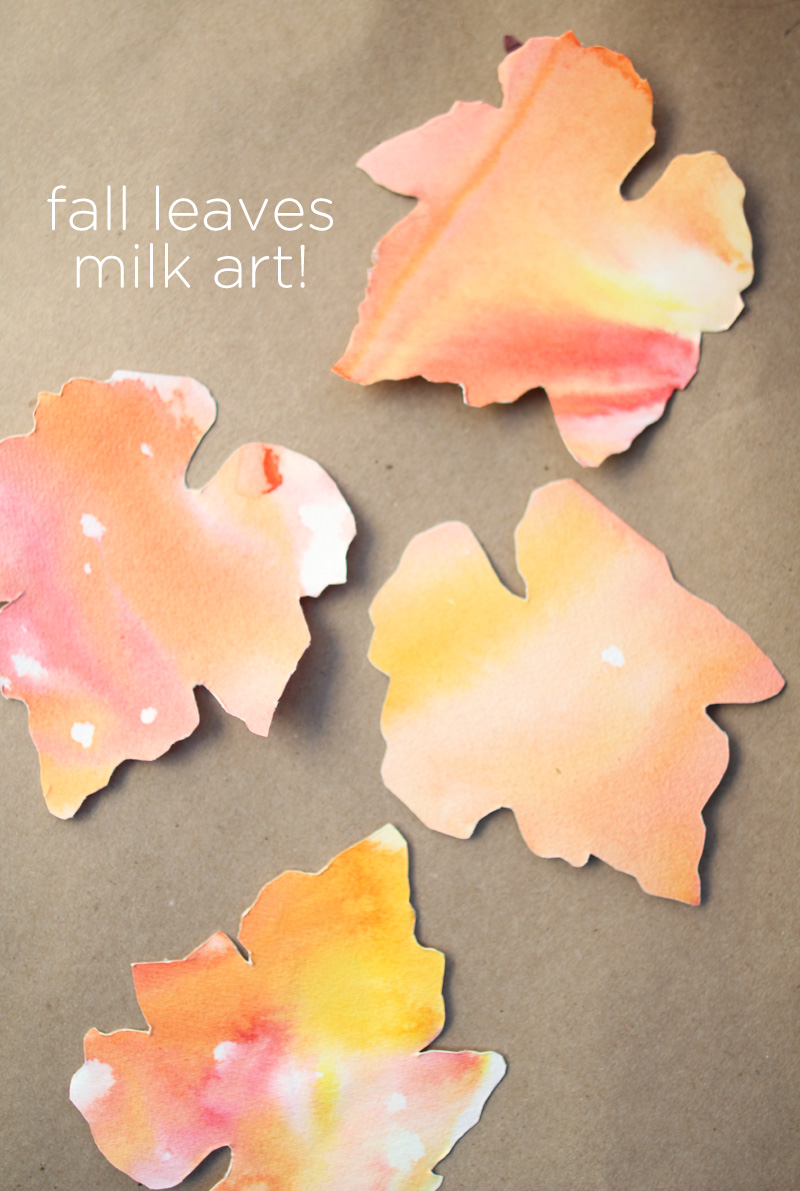
Then using pre-made templates, the kids traced leaves onto watercolor paper (key that it’s watercolor paper) and cut out their drawings. Older children might want to sketch their own leaf shapes by observing what they’ve found in nature. 
Kid's Thanksgiving Project Idea: Fall Leaves Milk Art & Place Cards | PepperDesignBlog.com
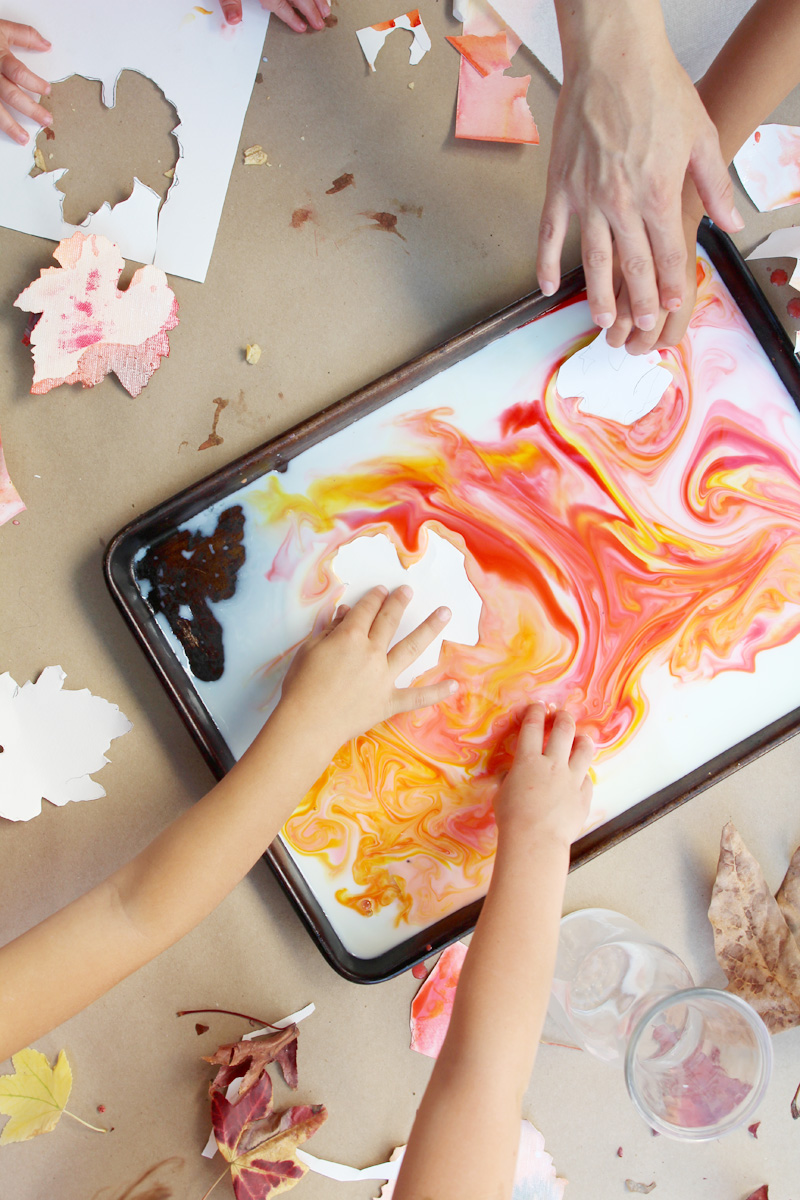
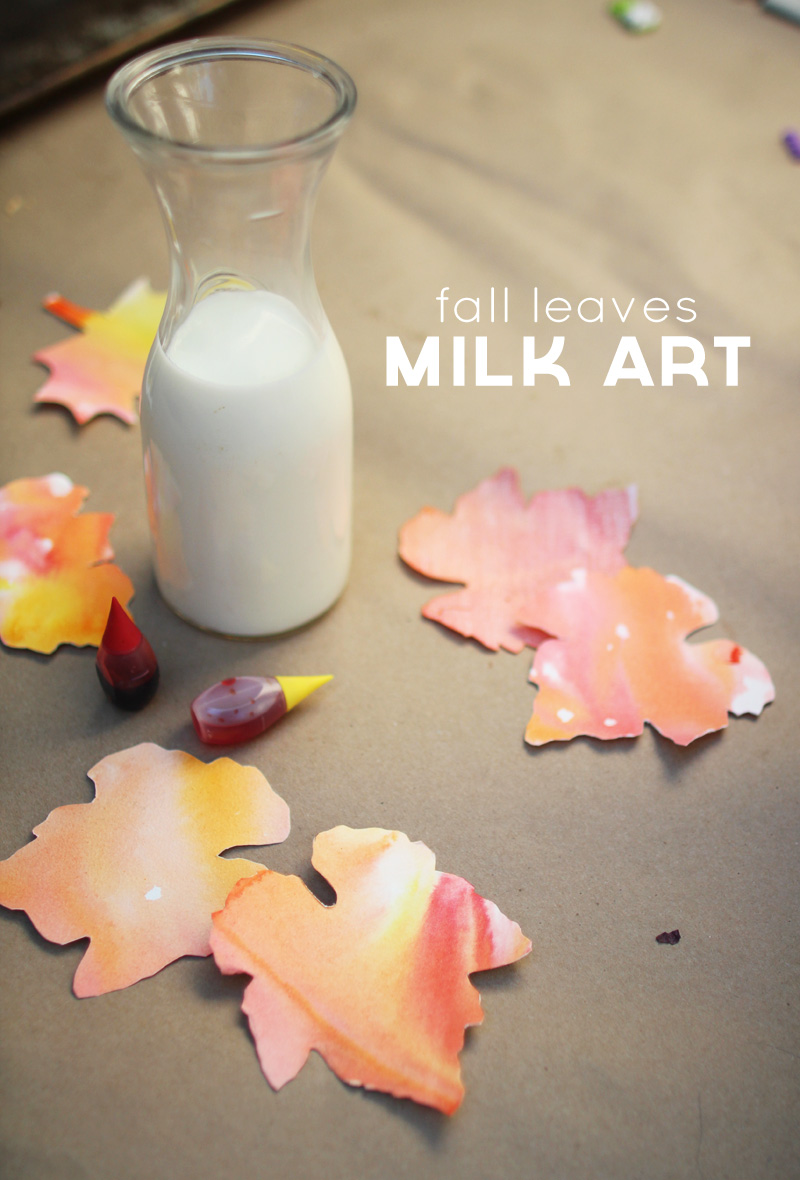
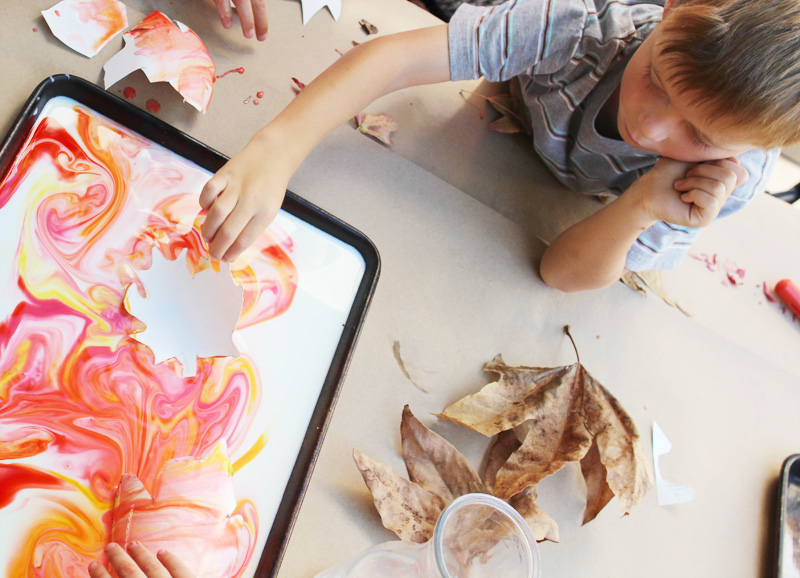
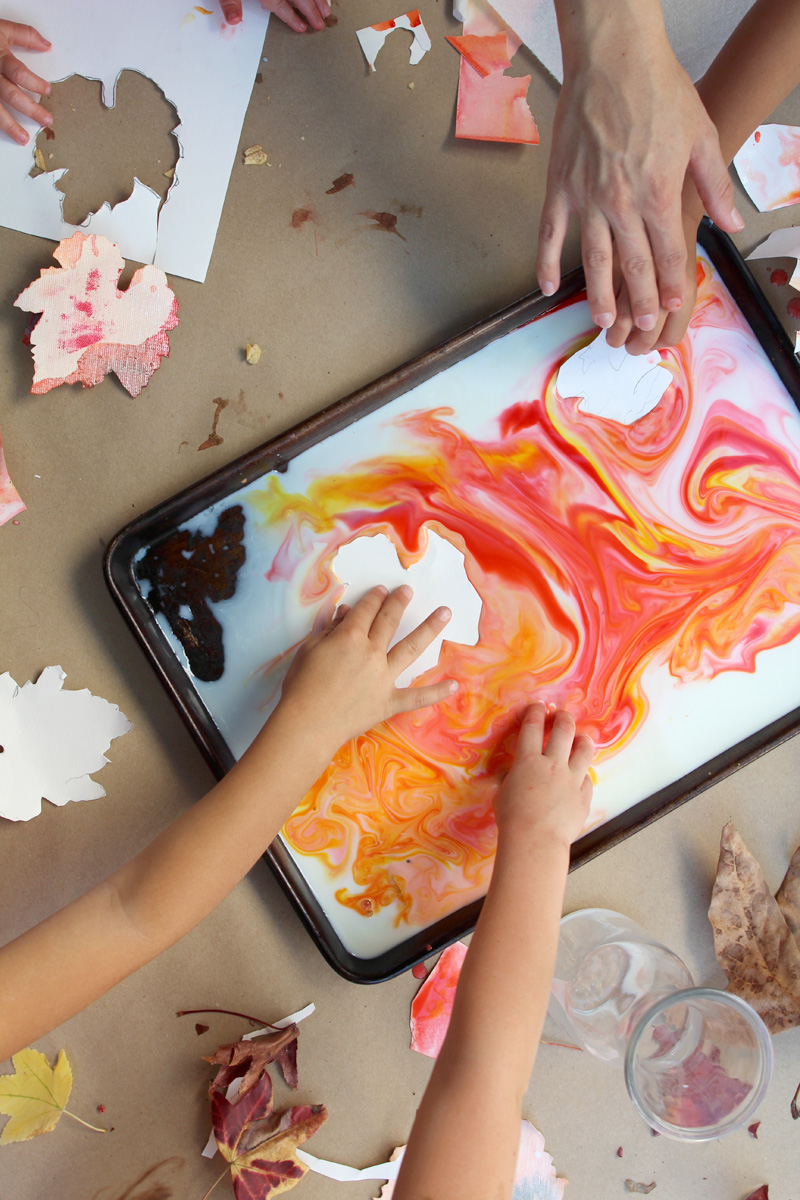
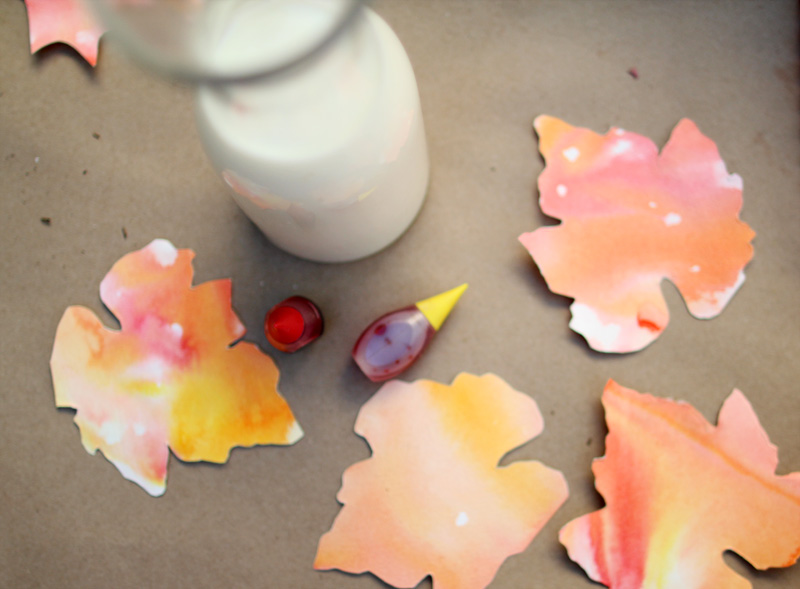
Next up was the fun part: I poured a thin layer of milk into a cookie sheet and then added 3-4 drops each of yellow and red food coloring. The droplets expanded immediately across the top of the milk and will create a ‘marbled’ effect if swirled a bit.
Kid's Thanksgiving Project Idea: Fall Leaves Milk Art & Place Cards | PepperDesignBlog.com
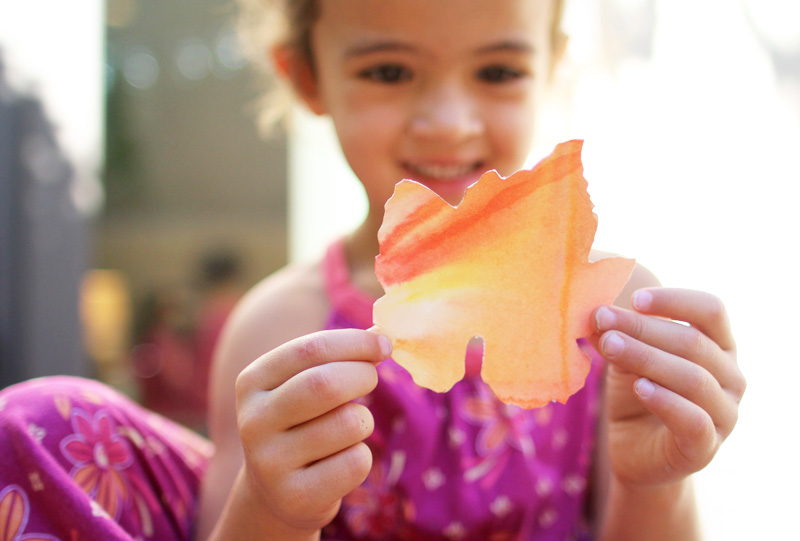
By carefully dragging the watercolor paper along the surface of the milk, the design transfers over, leaving beautifully dyed fall leaves.
Kid's Thanksgiving Project Idea: Fall Leaves Milk Art & Place Cards | PepperDesignBlog.com
The trick is to encourage kids to ‘drag’ rather than ‘plunge’ their paper. If I could do this lesson over again, I’d probably have a handful of extra leaves ready to go for practicing before the kids tried out the milk marbling with their own leaves.
Kid's Thanksgiving Project Idea: Fall Leaves Milk Art & Place Cards | PepperDesignBlog.com
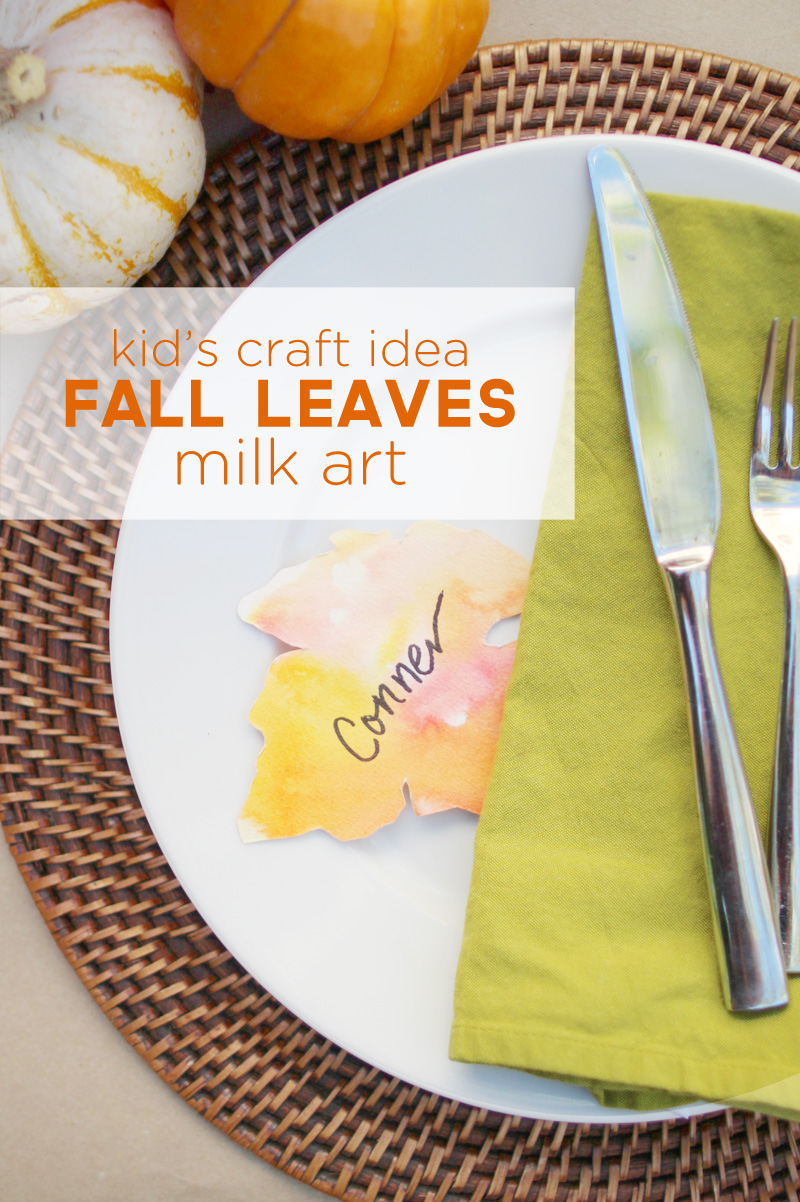
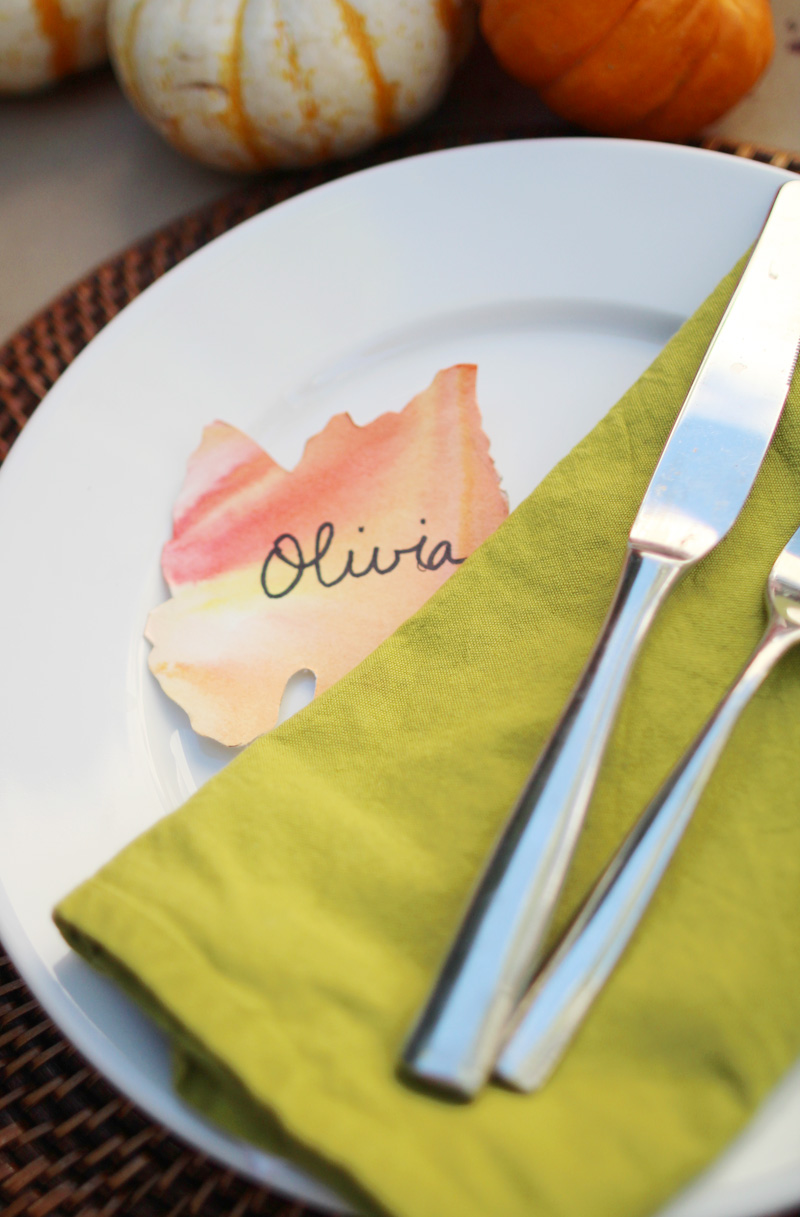
The results were so pretty though – pretty enough that Livy and I made a handful together to use as place cards for Thanksgiving.
Kid's Thanksgiving Project Idea: Fall Leaves Milk Art & Place Cards | PepperDesignBlog.com
While the leaves dried, everyone enjoyed snacks and glasses of cold milk (the non-marbled kind). The paper took only 30 or so minutes to dry so everyone was able to take their leaves home with them that day.
Kid's Thanksgiving Project Idea: Fall Leaves Milk Art & Place Cards | PepperDesignBlog.com
These Thursday mornings are a few of my favorite hours during the week. It’s wonderful to get together as friends and to share in the education and active learning of our little ones. Rearranging my work schedule to cut out the morning of a very busy day was not easy, but it helps bring balance to a busy week and is something that I look forward to so much.

Happy Thanksgiving Everyone! I hope your day tomorrow is restful and you are surrounded by the ones you love and cherish most!

I am 30

Tuesday, November 25, 2014


So this happened today. I am 30. Wow that just seems crazy to me. I feel like it was just yesterday I was half this age, and just a second ago I was writing my 30 before 30 list.  I am SO grateful for the gift of life. Thank you Jesus for the people you have put into my life, that has made my life truly worth living.  We celebrated this monumental birthday last weekend. My husband planned an Scavenger Hunt around our city. It was epic. Truly an adventure and so much fun! There were 3 teams and we were all fighting for a cash prize, so safe to say we did all sort of crazy stuff with strangers to gain the most points and it was all documented on a shared photo stream throughout the night.  

We had dinner at the end of the night, played games, of course ate cake. I was honored by many beautiful toasts given by friends and family...my hurt was bursting. And we did some music video footage shooting too, which I hope to show on the blog soon! I am dying to see it myself, my amazing brother is putting it all together, and I am trying really hard to be patient, so you will have to wait with me!


Friends, Family, Followers- Thank you for the birthday wishes, prayers, love and support. Feeling very blessed today and I am truly grateful for all of you in my life!


Leather Statement Necklace // Chevron

Monday, November 24, 2014


This one is my favorite. Gosh, but really is hard to decide though between all four! This is the third tutorial out of the four I am covering. Hope you enjoy it

Supplies:


Step 1: Cut out a rectangle of leather


Step 2: Use this template to trace the shapes you need for the necklaces


Step 3: Cut out the Chevron shapes


Step 4: Use a push pin to make holes for your jump rings


Step 5: Insert jump ring into hole ** tip: insery jump ring right after you puncture hole, because the leather will close up the hole quickly if it just sits


Step 6: After all your jump rings are in, close them up with pliers


Step 7: Leave the top jump rings open for necklace chain **tip: when making holes make sure your designated bottom chevron only has one set of holes on the top, not the bottom


Step 8: Insert ends of chain into top jump rings and close up


All Done!!


How to Style the Chevron:


Leggings- Target // Shirt- Roxy // Chambray Top- Thrift // Bracelet- Present (from India!)


Well, we have covered 3 of the 4 necklaces in this series so far, if you missed them here they are:

Tassel Necklace
Fringe Necklace

Stay tuned for the last tutorial on how to make the Feather Leather necklace!


Related Posts Plugin for WordPress, Blogger...